웹/Back End
로그인 기능 구현 - JWT, Spring Security
물꼮이
2023. 11. 29. 06:48
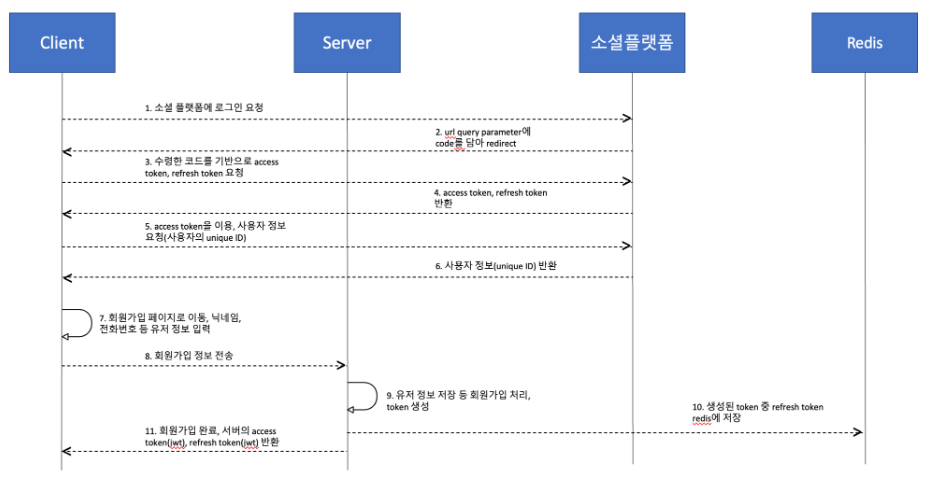
Spring Security, JWT, Redis를 함께 사용하여 로그인 기능을 구현한 시스템 아키텍처의 도형도
1. 클라이언트는 아이디와 비밀번호를 입력하여 로그인을 시도합니다.
2. 서버는 입력된 정보를 확인하고, 인증이 성공한 경우 JWT 토큰을 생성합니다.
3. 서버는 생성된 JWT 토큰을 Redis에 저장하고, 클라이언트에게 응답으로 전달합니다.
4. 클라이언트는 응답으로 받은 JWT 토큰을 쿠키에 저장합니다.
5. 이후 클라이언트의 요청에는 쿠키에 저장된 JWT 토큰이 함께 전송됩니다.
6. 서버는 클라이언트의 요청에 포함된 JWT 토큰을 검증하고, Redis에서 해당 토큰을 조회하여 인증을 처리합니다.
7. 인증이 성공한 경우, 서버는 요청에 대한 응답을 반환합니다.
8. 로그아웃 시, 클라이언트는 쿠키에서 저장된 JWT 토큰을 삭제하여 인증 상태를 해제합니다.

Spring Boot 환경에서 JWT를 사용한 로그인 구현
JWT( JSON Web Token)는 웹 표준으로, 클라이언트와 서버 간의 정보를 안전하게 전송하기 위해 사용됩니다.
- 의존성 추가
먼저, Spring Boot 프로젝트의 pom.xml 파일에 다음 의존성을 추가해야 합니다.<dependency> <groupId>io.jsonwebtoken</groupId> <artifactId>jjwt</artifactId> <version>0.9.1</version> </dependency> - JWT 토큰 생성 및 검증
로그인 시 JWT 토큰을 생성하여 클라이언트에게 전달하고, 이후 요청에 대해 토큰의 유효성을 검증해야 합니다. 다음은 JWT 토큰을 생성하고 검증하는 예제 코드입니다.import io.jsonwebtoken.Claims; import io.jsonwebtoken.Jwts; import io.jsonwebtoken.SignatureAlgorithm; import java.util.Date; public class JwtUtils { private static final String SECRET_KEY = "your-secret-key"; private static final long EXPIRATION_TIME = 86400000; // 24 hours public static String generateToken(String username) { Date now = new Date(); Date expirationDate = new Date(now.getTime() + EXPIRATION_TIME); return Jwts.builder() .setSubject(username) .setIssuedAt(now) .setExpiration(expirationDate) .signWith(SignatureAlgorithm.HS512, SECRET_KEY) .compact(); } public static boolean validateToken(String token) { try { Jwts.parser().setSigningKey(SECRET_KEY).parseClaimsJws(token); return true; } catch (Exception e) { return false; } } public static String getUsernameFromToken(String token) { Claims claims = Jwts.parser().setSigningKey(SECRET_KEY).parseClaimsJws(token).getBody(); return claims.getSubject(); } } - 로그인 API 구현
로그인 API에서는 사용자가 입력한 아이디와 비밀번호를 검증한 후, 유효한 경우 JWT 토큰을 생성하여 클라이언트에게 반환해야 합니다. 다음은 Spring Boot에서 로그인 API를 구현하는 예제 코드입니다.import org.springframework.web.bind.annotation.PostMapping; import org.springframework.web.bind.annotation.RequestBody; import org.springframework.web.bind.annotation.RestController; @RestController public class LoginController { @PostMapping("/login") public String login(@RequestBody LoginRequest request) { // 사용자 아이디와 비밀번호 검증 로직 작성 // 유효한 경우 JWT 토큰 생성 String token = JwtUtils.generateToken(request.getUsername()); return token; } }- 인증 필터 구현
- 인증 필터 구현
-
import org.springframework.security.core.Authentication; import org.springframework.security.core.context.SecurityContextHolder; import org.springframework.web.filter.OncePerRequestFilter; import javax.servlet.FilterChain; import javax.servlet.ServletException; import javax.servlet.http.HttpServletRequest; import javax.servlet.http.HttpServletResponse; import java.io.IOException; public class JwtAuthenticationFilter extends OncePerRequestFilter { private JwtTokenProvider jwtTokenProvider; public JwtAuthenticationFilter(JwtTokenProvider jwtTokenProvider) { this.jwtTokenProvider = jwtTokenProvider; } @Override protected void doFilterInternal(HttpServletRequest request, HttpServletResponse response, FilterChain filterChain) throws ServletException, IOException { String token = jwtTokenProvider.resolveToken(request); if (token != null && jwtTokenProvider.validateToken(token)) { Authentication authentication = jwtTokenProvider.getAuthentication(token); SecurityContextHolder.getContext().setAuthentication(authentication); } filterChain.doFilter(request, response); } }
- 보안 설정
-
import org.springframework.beans.factory.annotation.Autowired;
import org.springframework.context.annotation.Configuration;
import org.springframework.security.config.annotation.web.builders.HttpSecurity;
import org.springframework.security.config.annotation.web.configuration.EnableWebSecurity;
import org.springframework.security.config.annotation.web.configuration.WebSecurityConfigurerAdapter;

@Configuration
@EnableWebSecurity
public class SecurityConfig extends WebSecurityConfigurerAdapter {

    private JwtTokenProvider jwtTokenProvider;

    @Autowired
    public SecurityConfig(JwtTokenProvider jwtTokenProvider) {
        this.jwtTokenProvider = jwtTokenProvider;
    }

    @Override
    protected void configure(HttpSecurity http) throws Exception {
        http
            .csrf().disable()
            .authorizeRequests()
                .antMatchers("/login").permitAll()
                .anyRequest().authenticated()
                .and()
            .addFilterBefore(new JwtAuthenticationFilter(jwtTokenProvider), UsernamePasswordAuthenticationFilter.class);
    }
}
- 인증 필터 구현